


30. 03. 2025
NetEye, Unified Monitoring

Choosing the right backup solution is critical for system administrators and IT professionals. The upcoming NetEye 4.41 version will bring an update to MariaDB, moving from version 10.3 to 10.11. This makes it especially timely to explore the opportunities offered by the Mariabackup tool in order to be fully prepared for the changes ahead. This article is for those who are new to MariaDB’s backup solution or have minimal experience using it.
What is Mariabackup?
Mariabackup is a free and open-source tool that allows you to create and restore full database backups for MariaDB databases. This method is faster and potentially more secure than backup methods based on SQL dumps.
Mariabackup can be used locally or in remote environments, and supports compression and parallel execution, which can significantly speed up the backup process. It also offers encryption options as well as incremental and differential backups.
In the world of MariaDB, Mariabackup is a popular and efficient tool that delivers exceptional performance and flexibility. In this article, I’ll demonstrate how to use Mariabackup, discuss its advantages and disadvantages compared to traditional logical backups, and include a brief demo illustrating the process of database backup and restoration.
Why is Database Backup Important?
At first, we might assume nothing will go wrong: our database runs in a cluster, the hard drives operate in RAID, we’ve never had issues before, and we already perform daily full-file backups.
However, the reality is that managing databases is far more complex. Simple file system backups aren’t enough for databases as they don’t ensure data consistency or handle active transactions. Without proper locking, ongoing data changes and interruptions can cause corrupted backups.
To create consistent backups, use database-specific tools that temporarily pause write operations, capturing the database state accurately. Regular backups are essential for protecting against data loss, recovering quickly from errors, and minimizing downtime.
Let’s See How Mariabackup Works!
Mariabackup saves data files directly instead of creating an SQL file, like logical backups such as mysqldump. This approach is particularly beneficial for larger databases, as it can significantly reduce backup time.
Here’s a quick summary of its advantages:
- Speed: Physical backups are much faster, often completed in just a few minutes, whereas logical backups, especially with large datasets, can take hours.
- Restore Time: Restoring a database is much faster, since saved files can be copied directly back. However, keep in mind that the database must be stopped, though this usually only takes a few minutes.
- Lock-Free Operation: Mariabackup uses a transaction log, allowing write operations to continue uninterrupted during the backup process. No locking is required for InnoDB storage engines (though you’ll need to use the –no-lock option), and if locking is necessary, it’s minimal, lasting only a few seconds. Additionally, the backup process can be interrupted at any time since only read operations are performed on the database.
- Support for Incremental Backups: Only changed data is backed up, reducing storage needs and speeding up the process.
- Compression and Encryption: Data compression and encryption make storage and transfer secure. Third-party tools such as OpenSSL, GPG, Zstd, 7-Zip, and Gzip can be seamlessly integrated with Mariabackup for this purpose.
For fairness, let’s also point out some disadvantages compared to logical backup solutions like mysqldump:
- Service Downtime for Restoration: As mentioned earlier, restoring data isn’t possible without stopping the database. However, with a properly prepared backup, downtime can be minimized. Even for larger databases, the downtime can be reduced to just a few minutes, as the restoration speed is mainly determined by file copying speed.
- Compatibility Limitations: Mariabackup is only compatible with MariaDB systems, and without proper preparation, it can only be used with databases of the same version. To upgrade an older backup to a newer database version, ensure the backup is prepared using a version of Mariabackup that is fully compatible with the updated database.
When Should You Use Mariabackup?
- For large databases: If you’re working with multi-gigabyte or terabyte-sized databases, reducing backup time is critical.
- For systems requiring critical availability: Where recovery of a damaged database requires speed, extended downtime is not an option. The process must be completed within minutes to ensure minimal disruption.
- For regular incremental backups: When optimizing storage space is a priority.
- In encrypted environments: It fully meets data security requirements, since, as mentioned above, Mariabackup supports multiple encryption methods.
Demo: Database Backup and Restore
Now that the dry theory is over, let’s look at a short example of backing up and restoring a database using the Mariabackup tool.
In this section, I’ll walk you through a simple backup and restore process step by step. For simplicity, I’ll be using a NetEye test system.
1. Create an LVM partition for the backup
First, let’s create a separate LVM partition and directories for the backups:
lvcreate -L 10G -n lvmariabackup vg00
mkfs.xfs /dev/vg00/lvmariabackup
mkdir -p /data/backup/mariadb
echo "/dev/vg00/lvmariabackup  /data/backup/mariadb xfs  defaults  0  0" >> /etc/fstab
systemctl daemon-reload && mount -av
If the mount works successfully, we can move on to the next step.

2. Create a Dedicated Database User
To ensure the safety of backup operations, I advise creating a dedicated user with only the necessary permissions:
mysql -u root -p -e "CREATE USER 'backup_user'@'localhost' IDENTIFIED BY 'secure_password';"
mysql -u root -p -e "GRANT RELOAD, PROCESS, LOCK TABLES, REPLICATION CLIENT ON *.* TO 'backup_user'@'localhost';"
It’s important to highlight that the backup_user, based on the permissions set above, can only access the database from localhost.
3. Starting the Backup
- Create the necessary directories:
mkdir /data/backup/mariadb/files /data/backup/mariadb/tmp
- Query the current settings:
mariabackup --print-defaults

Since the datadir is located in a different place in the NetEye system, I override the default setting using the --datadir parameter and add the other necessary arguments as well. For more clarity, I’ll now use a dedicated configuration file, although this can also be done directly in the command line.
cat <<EOF> /root/mariabackup.cnf
[mysqld]
datadir=/neteye/shared/mysql/data

[mariabackup]
target-dir=/data/backup/mariadb/files
tmpdir=/data/backup/mariadb/tmp
user=backup_user
password=secure_password
EOF
Let’s check the settings again:
mariabackup --defaults-file=/root/mariabackup.cnf --print-defaults

If everything is ready, let’s start the backup process. I’ll use the root user for the backup now, but you can also create a dedicated user for this purpose. It’s important that the user has appropriate access to the MariaDB files. I specify the path to the prepared configuration file using the --defaults-file parameter. The --verbose parameter is optional.
mariabackup --defaults-file=/root/mariabackup.cnf --backup --verbose
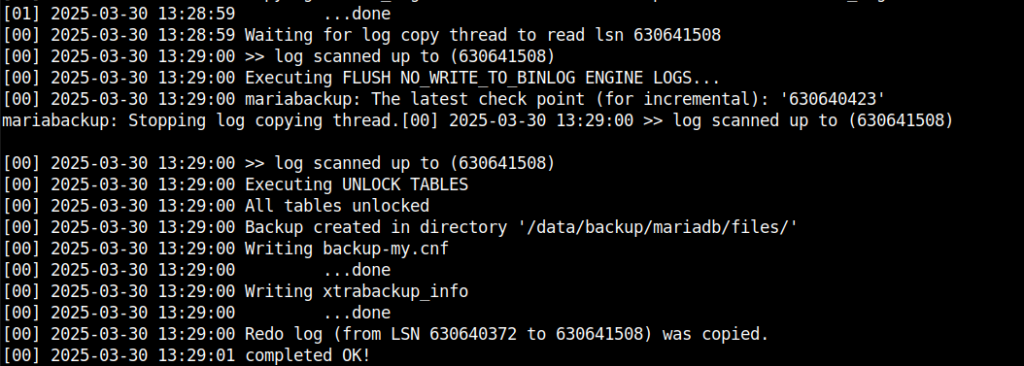
The backup was completed within moments, as the database contained minimal information due to the nature of the test system. However, below are two data points from other backups:
- Database size 12GB: 25 seconds
- Database size 205GB: 7 minutes 34 seconds
It’s clear that backing up a relatively large 205GB database takes only 7.5 minutes. This is extremely efficient, especially when compared to a mysqldump-based backup, which can take hours.
4. Preparing the Database for Restoration
To ensure the backup can be restored – meaning the saved data can be easily copied back into the datadir directory – we first need to ensure its consistency. This can be done using the following command:
mariabackup --defaults-file=/root/mariabackup.cnf --prepare
If we don’t have a configuration file, the target-dir parameter must be provided with the correct path. The process is extremely fast, taking only a few seconds. Referring to the examples above, here are the preparation times in detail:
- For a 12GB database, preparation takes: 1.5 seconds
- For a 205GB database, preparation takes: 23 seconds
5. Restore
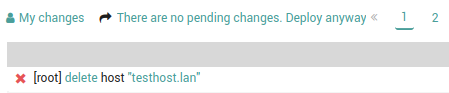
Before I copy back the database files, for demonstration purposes I’m going to delete a node from my test system and then save the changes.
Before starting the restoration process, it’s essential to stop the MariaDB service. Then you need to delete the files in the datadir folder, or alternatively, you can use the --force-non-empty-directories parameter. If you don’t have a configuration file, you still need to specify the target-dir path.
The file copying can be done using the mariabackup command, but as an alternative, you can also use tools like cp or rsync. After copying the files back, don’t forget to set the permissions correctly. Finally, restart the database as the last step.
The restoration process:
systemctl stop mariadb
rm -rf /neteye/shared/mysql/data/*
mariabackup --defaults-file=/root/mariabackup.cnf --copy-back
chown -R mysql:mysql /neteye/shared/mysql/data
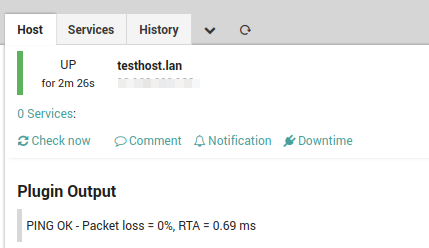
systemctl start mariadbAfter the restoration, we need to check everything is operating properly. The previously deleted host should be back in the system:
What’s Worth Noting?
Mariabackup is an excellent tool for fast and efficient backups of large databases. While it may require a more complex configuration, the speed and reliability it offers can be a significant advantage for those responsible for critical systems. At the same time, it’s worth mentioning mysqldump, which, thanks to its simpler configuration and compatibility, can also be an important tool in your backup strategy.
For maximum data security, it’s a good idea to use both solutions. This way, in the event of a restoration, you can freely choose between the speed of mariabackup and the flexibility of mysqldump, depending on your needs.
For more information, visit the following links:
These Solutions are Engineered by Humans
Did you find this article interesting? Does it match your skill set? Programming is at the heart of how we develop customized solutions. In fact, we’re currently hiring for roles just like this and others here at Würth Phoenix.
Csaba Remenar
Technical Consultant at Würth Phoenix