GUI-based setup of GLPI Network Inventory: The Agent Toolbox
GLPI agents have various additional functionalities, from network discovery to remote inventory and esx inventory. These can be controlled directly from command line (see my colleague’s blog https://www.neteye-blog.com/2024/07/glpi-device-discovery/ for some practical examples) or centralized, from the server, via the GLPI Inventory plugin (https://www.neteye-blog.com/2024/12/gui-based-glpi-network-inventory-setup-with-the-glpi-inventory-plugin/). There exists another handy possibility to configure these inventories in a local, decentralized way: The GLPI Agent TOOLBOX.
The GLPI Agent web server
Everybody that installed and tested GLPI agents, knows about the small web server that the agent opens at http://localhost:62354/, which just gives some basic status and version information and a single link to http://localhost:62354/now to force an inventory. As you probably know, this web server can be disabled by configuring the agent with parameter “no_httpd = 1”. We encourage to disable the internal web server on any production environment where this functionality is not needed.
The GLPI Agent Toolbox
The Toolbox, a web interface for configuring inventories, is disabled by default. It needs to be enabled by editing the file toolbox-plugin.cfg in the agent configuration folder, C:\Program Files\GLPI-Agent\etc\ on a standard Windows installation. Copy this file to “toolbox-plugin.local” , set the parameter “disabled=no” and comment the last line “#include “toolbox-plugin.local”.
Now, the toolbox is available under http://localhost:62354/toolbox. Before you can use it, you need to enable all options in the navigation bar: click on the cog symbol on the upper right corner, and then select all entries in the section “navigation bar”.
Toolbox configuration
Let’s see how to configure the agent for network inventory.
Frist, select “Scheduling” and configure either a timeslot for agent execution or a execution delay (e.g. 2h, 24h). Then, define your SNMP communities in the “credential” section. Here, define the credential type. As a main difference from the GLPI inventory plugin, here the credential type defines the functionality that will be executed: snmp, ssh/winrm (remote computer inventory), or esx. Here, select “snmp”, chose the snmp version and fill in the community.
Now, define one or more IP ranges and associate the SNMP credentials.

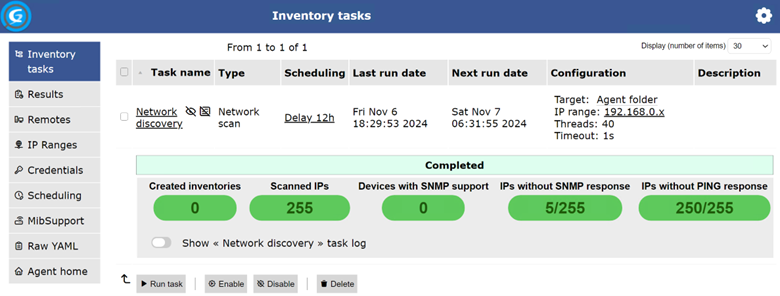
Voilà! Go to the first tab and add some “Inventory Tasks” for the network scan, by putting together the IP Ranges, the time scheduling, the number of scan threads to run in parallel and the target: either you store the data just locally or send it to the GLPI server. You don’t need to define the server here. The toolbox always uses the same server defined for the agent itself.
Everything is ready now – for a test, press “Run task”. The progress bar advances, and eventually the results are displayed. Note that the toolbox interface performs network discovery and network inventory tasks simultaneously.

On the results page you can view all details and even download all the scan results in JSON. The scan results are also automatially sent to the GLPI server.
With this you have seen the third possibility of using a GLPI Agent to scan and inventory your network. The Toolbox could be used when centralized management is not desired or not possible. Be aware that in this testing example we enabled the toolbox for all users. Please read in toe official documentation https://glpi-agent.readthedocs.io/en/latest/plugins/toolbox-plugin.html on how to limit access to single IP addresses.
Let’s rock the IT with GLPI!


