
17. 07. 2024
Lorenzo Candeago
DevOps
How to Add SSH Keys to ArgoCD and Tekton on OpenShift to Access Gitea: Part2 – Add an SSH Key as a Secret to ArgoCD and Run a Test Deployment
In my previous post, we set up our test environment and a Gitea operator. In this blog post we’ll install the OpenShift GitOps operator and run a simple deployment. This setup allows us to test OpenShift-specific security constraints (such as OpenShift-specific SCCs, non privileged containers by default, etc.) in a test environment before going into production.
As a first step for setting up our test environment, we need to install the OpenShift GitOps operator:

Let’s write the definition of our deployment on a repo in Gitea in such a way that we can deploy it automatically using ArgoCD and create an unprivileged test app, a service and a route. We’ll use nginx-unprivileged.
In our test repo, let’s create a folder called nginx-unprivileged and three files inside the folder:
nginx-unprivileged-deployment.yaml
apiVersion: apps/v1
kind: Deployment
metadata:
  name: nginx-unprivilged
spec:
  replicas: 1
  revisionHistoryLimit: 3
  selector:
    matchLabels:
      app: nginx-unprivileged
  template:
    metadata:
      labels:
        app: nginx-unprivileged
     spec:
       containers:
         - image: nginxinc/nginx-unprivileged
            name: nginx-unprivileged
            ports:
            - containerPort: 8080
nginx-unprivileged-service.yaml
apiVersion: v1
kind: Service
metadata:
  name: nginx-unprivileged
spec:
  ports:
     - ports: 80
           targetPort: 8080
    selector:
       app: nginx-unprivileged
and nginx-unprivileged-route.yaml, which for simplicity will not have TLS termination:
kind: Route
apiVersion: route.openshift.io/v1
metadata:
  name: nginx-unprivileged
  labels:
    app.kubernetes.io/instance: nginx-unprivileged
  spec:
   to:
     kind: Service
     name: nginx-unprivileged
   tls: null
   port:
     targetPort: 8080
After creating the files and adding them to our test repo, we can push it to our Gitea instance after port-forwarding to the Gitea SSH port (2222)
oc login -u kubeadmin https://api.crc.testing:6443
oc --namespace default port-forward svc/gitea-ssh 2222
GIT_SSH_COMMAND='ssh -i ../id_ed25519 -o IdentitiesOnly=yes -p 2222' git push
All right, now we are finally ready to add our ssh key to ArgoCD and test a deployment.
Let’s add our private key as argocd repo-creds. We’ll use a repo credential template, so we can clone all the repos in our Gitea instance without adding the private ssh key for each repo. Since this is a test setup and we didn’t properly expose the gitea-ssh service outside of the cluster, we’ll directly access the gitea-ssh service from within the cluster and not bother setting up the certificates.
We’ll use a declarative approach, although this can also be done from the ArgoCD UI. Note that the URL should include the user, i.e.: ssh://git@gitea-ssh.default.svc.cluster.local:2222/gitea_admin/
Let’s write gitea-ssh-secret.yaml like this:
apiVersion: v1
kind: Secret
metadata:
  name: gitea-ssh-key
  namespace: openshift-gitops
labels:
    argocd.argoproj.io/secret-type: repo-creds
stringData:
  url: "ssh://git@gitea-ssh.default.svc.cluster.local:2222/gitea_admin/"
  sshPrivateKey: |
    -----BEGIN OPENSSH PRIVATE KEY-----
    b3BlbnNzaC1rZXktdjEAAAAABG5vbmUAAAAEbm9uZQAAAAAAAAABAAAAMwAAAAtzc2gtZW
    QyNTUxOQAAACDFYyNY63m59HexkT03xbdio8Z+PGfLth/PKYADqrZPXgAAAKA4gznWOIM5
    1gAAAAtzc2gtZWQyNTUxOQAAACDFYyNY63m59HexkT03xbdio8Z+PGfLth/PKYADqrZPXg
    AAAEBMqwPDwzIvw24HOrdmqHgwpuEtXKNLxCV7CItlUBMNtMVjI1jrebn0d7GRPTfFt2Kj
    xn48Z8u2H88pgAOqtk9eAAAAGGxvQGxvY2FsaG9zdC5sb2NhbGRvbWFpbgECAwQF
    -----END OPENSSH PRIVATE KEY-----
And create the secret:
oc apply -f gitea-ssh-secret.yaml
Now let’s add our test repo, by creating gitea-test-repo.yaml. We’ll skip TLS verification (insecure: ture) for this test setup. We’re able to add a repository without the credentials, since the credential template has been used!
apiVersion: v1
kind: Secret
  metadata:
    name: test-repo
    namespace: openshift-gitops
    labels:
      argocd.argoproj.io/secret-type: repository
stringData:
  name: test-repo
  type: git
  url: "ssh://git@gitea-ssh.default.svc.cluster.local:2222/gitea_admin/test-repo.git"
  insecure: "true"
And apply the yaml:
oc apply -f gitea-test-repo.yaml
Now we can check that the credentials are correctly stored. Let’s retrieve the ArgoCD admin password:
oc get secret openshift-gitops-cluster -n openshift-gitops -o jsonpath='{.data.admin.password}' | base64 -d 3raR6bBi1lFmWOzX0JhxLUtIVyMpH7wQ
and log in to ArgoCD using the user admin at https://openshift-gitops-server-openshift-gitops.apps-crc.testing/settings/repos:

Now we can create our deployment. With the default configuration, OpenShift GitOps’ ArgoCD instance only can manage the namespace where it’s installed, so the auto-create namespace feature will not work by default: see this bug and the proposed solution. There are three possible workarounds for this issue:
- Manually create the namespace and assign the proper label to it
oc new-projectnginx
oc label namespacenginx"argocd.argoproj.io/managed-by=openshift-gitops" - Add the RBAC rule to allow ArgoCD to manage the namespace
oc new-project nginx
oc adm policy add-role-to-user admin system:serviceaccount:openshift-gitops:openshift-gitops-argocd-application-controller -n nginx - (not suggested in production environments) Add a RBAC rule to allow Argo to manage any namespace
oc adm policy add-role-to-user admin system:serviceaccount:openshift-gitops:openshift-gitops-argocd-application-controller
After fixing the permissions we can write out our test-app.yaml:
apiVersion: argoproj.io/v1alpha1
kind: Application
metadata:
  name: nginx-unprivileged
  namespace: openshift-gitops
spec:
  project: default
  source:
    repoURL: 'ssh://git@gitea-ssh.default.svc.cluster.local:2222/gitea_admin/test-repo.git'
    path: nginx-unprivileged
    targetRevision: HEAD
  destination:
    server: 'https://kubernetes.default.svc'
    namespace: nginx
  syncPolicy:
    automated:
    prune: true
    selfHeal: true
and create it:
oc apply -f test-app.yaml
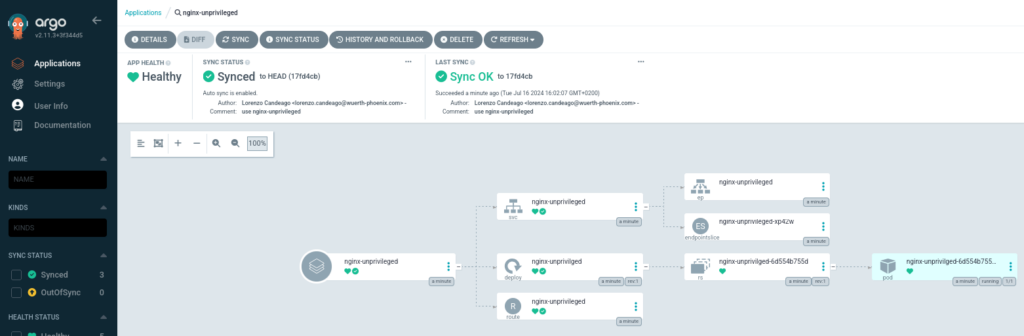
Hopefully, our app has now deployed without errors:
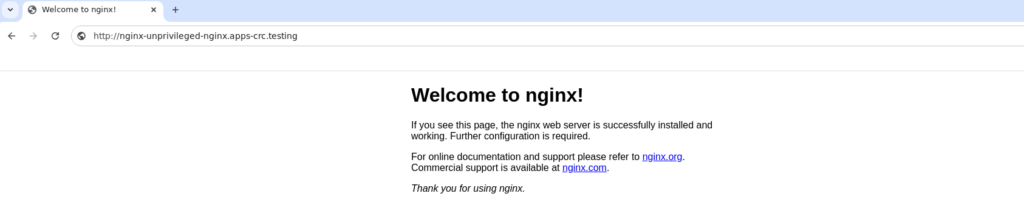
And we can now see that it actually works.
That’s it for this blog post, hope it was useful! In the next one I’ll show you how to use Tekton pipelines to clone via ssh from Gitea.
These Solutions are Engineered by Humans
Did you find this article interesting? Are you an “under the hood” kind of person? We’re really big on automation and we’re always looking for people in a similar vein to fill roles like this one as well as other roles here at Würth Phoenix.


Lorenzo Candeago
DevOps Engineer at Würth Phoenix
Author
Latest posts by Lorenzo Candeago
30. 07. 2024
DevOps
Terraform Integration with Ansible
29. 07. 2024
DevOps
include_task vs import_task in Ansible
24. 07. 2024
DevOps
How to Add SSH Keys to ArgoCD and Tekton on OpenShift to Access Gitea: Part 3 – A Simple Tekton TaskRun
17. 07. 2024
DevOps
How to Add SSH Keys to ArgoCD and Tekton on OpenShift to Access Gitea: Part1 – Set up the Test Environment and Add SSH Key to Gitea