Configuring the New Fleet Server on Elastic 8
The Fleet Management feature was automatically enabled with NetEye release 4.30, and with the current 4.31 version all the Elastic Stack packages will be upgraded to major version 8. These two milestones will permit us to centrally manage log ingestion using the new Elastic Agents (the evolutions of Beats Agents) and forget all the custom configurations files that an IT Admin used to have to create and deploy on all hosts where he/she wanted to collects log.
The Fleet Server is a component that connects Elastic Agents to Fleet. It supports many Elastic Agent connections and serves as a control plane for updating agent policies, collecting status information, and coordinating actions across Elastic Agents. It also provides a scalable architecture. As the size of your agent deployment grows, you can deploy additional Fleet Servers to manage the increased workload.
More details available on What is Fleet Server ? | Fleet and Elastic Agent Guide | Elastic
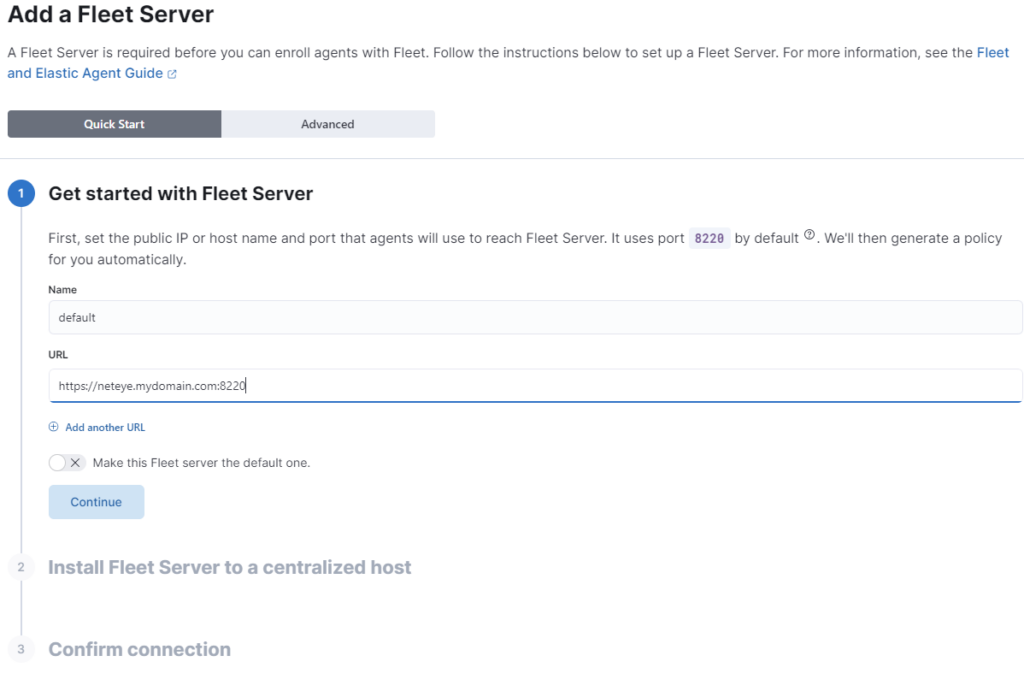
To configure the Server you can go to Log Analytics > Management > Fleet

A few important things regarding how to compose the Server URL:
- NetEye is founded on security-by-design so you MUST use HTTPS
- Choose a FQDN that can be reached everywhere on your network (if you also want to reach logs from external clients, you must use a valid PUBLIC URL, otherwise the NetEye FQDN should be okay)
- The port MUST be explicit within the URL, otherwise it will automatically use port 443. In the example below we use the default port used by ElasticAgent clients (8220 TCP).
TIPS: The Fleet Server port is not open by default on NetEye, so you must enable it in firewalld
firewall-cmd --add-port=8220/tcp --permanent
firewall-cmd --reload
After these steps you’ll be ready, so click CONTINUE to go on!
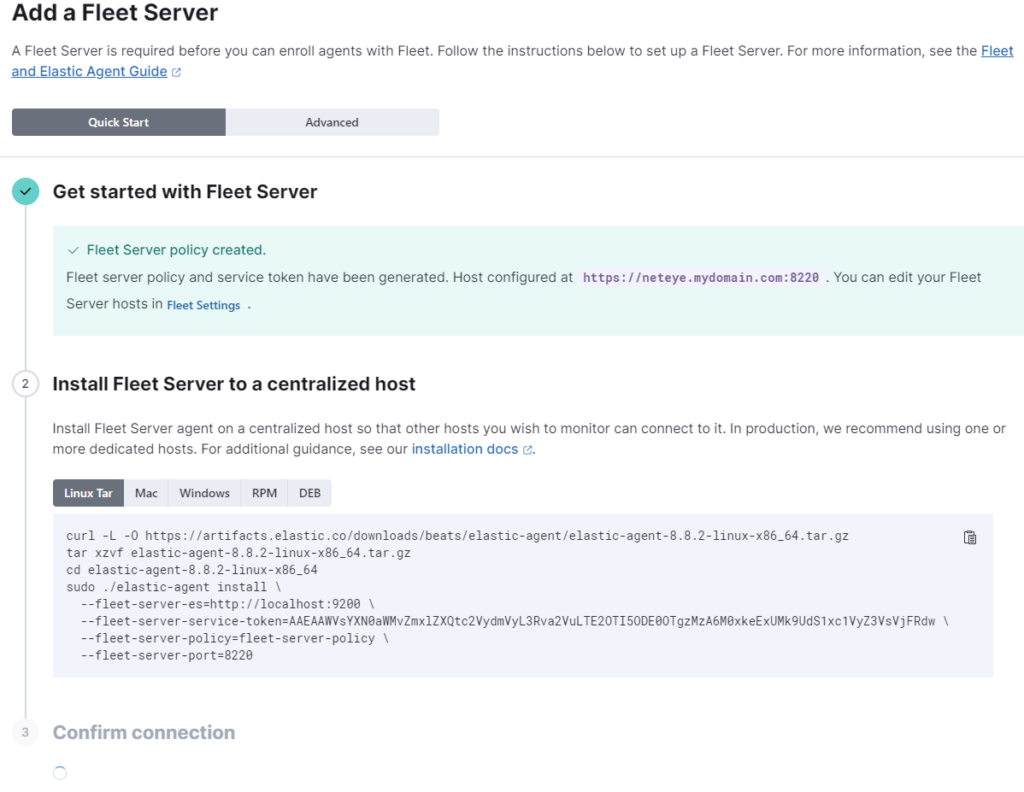
The wizard tells us that the policy has been created and provides some commands to install the ElasticAgent with the Fleet Server integration, but these commands are not correct for our NetEye installation.

First of all, NetEye provides a dedicated set of RPM packages that must be installed from our repository, not from Elastic Artifacts. You can use the following command for this:
dnf groupinstall "elastic-agent*" --enablerepo=neteye-extras
Keep in mind: on a NetEye Cluster you need to install the packages on each NetEye Node
The second thing to change regards the configuration output where the ElasticAgents (connected to our Fleet Server) must send their data to.
By default the wizard creates an output to the Elasticsearch localhost node, but this setting is not correct for our goal because the Elasticsearch DB must be reachable by Hosts/Agents deployed across the entire infrastructure.
To change this setting we need to go on Fleet > Settings. Under the Outputs section we can see the wrong configuration as in the screenshot below:

Things to be careful about:
- Elasticsearch is automatically exposed by NetEye on VIP of Cluster or NetEye FQDN at port 9200
- Communications on port 9200 are HTTPS
- Certificates exposed on NetEye are Self-Signed by the NetEye CA
With this information we can correctly set up the default output as in this example:

TIPS: The Elasticsearch certificate can be set to be automatically trusted on the client’s side with the ssl.certificate_authorities setting
Now all the configurations are correctly set up and we’re ready to enroll the ElasticAgent in our NetEye to become a Fleet Server.
The command should look something like this:
elastic-agent enroll --url=https://neteye.mydomain.com:8220 -v \
-f \
-e \
-d=* \
--path.logs=/neteye/local/elastic-agent/log \
--path.config=/neteye/local/elastic-agent/conf \
--path.install=/neteye/local/elastic-agent/data/install \
--fleet-server-es=https://neteye.mydomain.com:9200 \
--fleet-server-cert=/neteye/local/elastic-agent/conf/certs/mydomain.crt \
--fleet-server-cert-key=/neteye/local/elastic-agent/conf/certs/private/mydomain.key \
--fleet-server-policy=fleet-server-policy \
--fleet-server-service-token=AAEAAWVsYXN0aWMvZmxlZXQtc2VydmVyL3Rva2VuLTE2OTI5ODc1NDcyMTM6YmdEQWEwd0lRbC1xVHljOUtBX29Mdw
A quick overview of the arguments:
--urlis the URL of the Fleet Server set up on the Wizard (see initial configuration steps)--path.logs,--path.config,--path.installare the directories in NetEye where the RPM puts log, conf and exe files (you don’t need to change these)--fleet-server-esis the URL of Elasticsearch Output set up by the Wizard--fleet-server-certand--fleet-server-cert-keyare the certificate and key files for the exposed Fleet Server and where the external ElasticAgent point to--fleet-server-policyand--fleet-server-service-tokencome from the output command provided by the Wizard
TIPS: The fleet-server-service-token is used by the ElasticAgent to connect itself to Elasticsearch. The external agents should be able to connect both to Elasticsearch and to the Fleet Server to get the policies. In our example the external ElasticAgent MUST reach port 9200 and port 8220 on host neteye.mydomain.com
By default the Fleet Server service is not running after enroll and is also not enabled on boot, so you have to run the command: systemctl enable elastic-agent --now
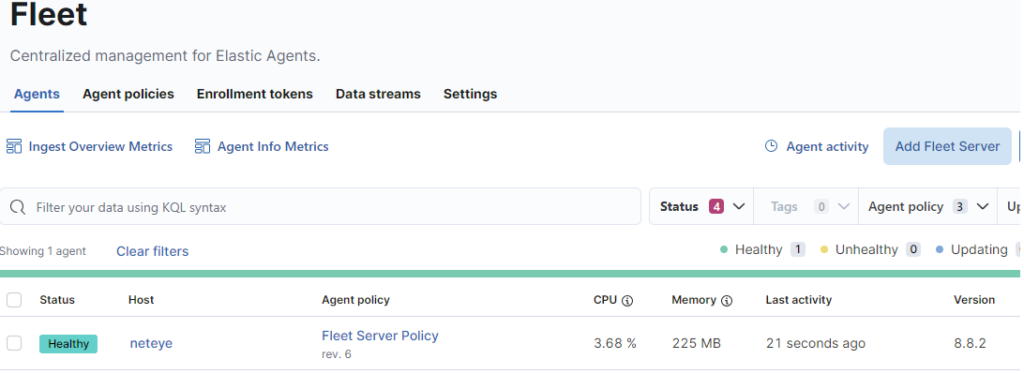
Well done! Now the Fleet Server is connected and we can see it in the Fleet GUI.

Final considerations
This model setup is very flexible and scalable; you can use more than one Fleet Server in your environment if you need to (for example when you have a NetEye Satellite).
Using an already-trusted CA in a Fleet Server lets you avoid manually installing the NetEye CA on all clients to permit the ElasticAgent installation.
In a NetEye Cluster you should load balance the Fleet Server using the native NGINX proxy, this avoids losing connections with the external agents should the host where the Fleet Server is running have some issues.
These Solutions are Engineered by Humans
Did you find this article interesting? Does it match your skill set? Our customers often present us with problems that need customized solutions. In fact, we’re currently hiring for roles just like this and others here at Würth Phoenix.


